Django 的类视图
前面第9节中我们简单介绍了 Django FBV 和 CBV,分别表示以函数形式定义的视图和以类形式定义的视图。函数视图便于理解,但是如果一个视图函数对应的 URL 路径支持多种不同的 HTTP 请求方式时,如 GET, POST, PUT 等,需要在一个函数中写不同的业务逻辑,这样导致写出的函数视图可读性不好。此外,函数视图的复用性不高,大量使用函数视图,导致的一个结果就是大量重复逻辑和代码,严重影响项目质量。而 Django 提供的 CBV 正是要解决这个问题而出现的,这也是官方强烈推荐使用的方式。
1. Django 类视图使用介绍
1.1 CBV 的基本使用
前面我们已经介绍了 CBV 的基本使用方法,其基本流程如下:
定义视图类 (TestView)
该类继承视图基类 View,然后实现对应 HTTP 请求的方法。Django 在 View 类的基础上又封装了许多视图类,如专门返回模板的 TemplateView 视图类、用于显示列表数据的 ListView 视图类等等。这些封装的是图能够进一步减少大家的重复代码,后面我会详细介绍这些封装的视图类的使用以及其源码实现。
# 代码路径 hello\_app/views.py
# ...

class TestView(View):
    def get(self, request, \*args, \*\*kwargs):
        return HttpResponse('hello, get\n')

    def post(self, request, \*args, \*\*kwargs):
        return HttpResponse('hello, post\n')

    def put(self, request, \*args, \*\*kwargs):
        return HttpResponse('hello, put\n')

    def delete(self, request, \*args, \*\*kwargs):
        return HttpResponse('hello, delete\n')

    @csrf_exempt
    def dispatch(self, request, \*args, \*\*kwargs):
        return super(TestView, self).dispatch(request, \*args, \*\*kwargs)
配置 URLConf,如下:
# 代码路径 hello\_app/urls.py
# ...

urlpatterns = [
    path('test-cbv/', views.TestView.as_view(), name="test-cbv")
]
注意:不是直接写视图类,而是要调用视图类的 as_view() 方法,这个 as_view() 方法返回的也是一个函数。
启动 Django 工程,测试:
# 启动django服务
(django-manual) [root@server first_django_app]# python manage.py runserver 0.0.0.0:8888
Watching for file changes with StatReloader
Performing system checks...

System check identified no issues (0 silenced).
April 15, 2020 - 07:08:32
Django version 2.2.11, using settings 'first_django_app.settings'
Starting development server at http://0.0.0.0:8888/
Quit the server with CONTROL-C

# 打开另一个xshell窗口,发送如下请求
[root@server ~]# curl -XGET http://127.0.0.1:8888/hello/test-cbv/
hello, get
[root@server ~]# curl -XPOST http://127.0.0.1:8888/hello/test-cbv/
hello, post
[root@server ~]# curl -XPUT http://127.0.0.1:8888/hello/test-cbv/
hello, put
[root@server ~]# curl -XDELETE http://127.0.0.1:8888/hello/test-cbv/
hello, delete
1.2 Django 中使用 Mixin
首先需要了解一下 Mixin 的概念,这里有一篇介绍 Python 中 Mixin 的文章:<<多重继承>> ,可以认真看下,加深对 Mixin 的理解。在我的理解中,Mixin 其实就是单独的一块功能类。假设 Django 中提供了 A、B、C 三个视图类,又有 X、Y、Z三个 Mixin 类。如果我们想要视图 A,同时需要额外的 X、Y功能,那么使用 Python 中的多重继承即可达到目的:
class NewView(A, X, Y):
    """
 定义新的视图
 """
    pass
我们来看看 Django 的官方文档是如何引出 Mixin 的:
Django’s built-in class-based views provide a lot of functionality, but some of it you may want to use separately. For instance, you may want to write a view that renders a template to make the HTTP response, but you can’t use TemplateView;perhaps you need to render a template only on
POST, withGETdoing something else entirely. While you could use TemplateResponse directly, this will likely result in duplicate code.For this reason, Django also provides a number of mixins that provide more discrete functionality. Template rendering, for instance, is encapsulated in the TemplateResponseMixin.
翻译过来就是: Django 内置的类视图提供了许多功能,但是我们可能只需要其中的一部分功能。例如我想写一个视图,该视图使用由模板文件渲染后的 HTML 来响应客户端的 HTTP 请求,但是我们又不能使用 TemplateView 来实现,因为我只想在 POST 请求上使用这个模板渲染的功能,而在 GET 请求时做其他事情。当然,可以直接使用 TemplateResponse 来完成,这样就会导致代码重复。基于这个原因, Django 内部提供了许多离散功能的 mixins。
可以看到,这里的 mixins 就是一些单独功能的类,配合视图类一起使用,用于组合出各种功能的视图。接下来,我们结合前面的 Member 表来使用下 mixin 功能。具体的步骤如下:
改造原来的视图类-TestView。我们给原来的视图类多继承一个 mixin,用于实现单个对象查找查找功能;
from django.shortcuts import render
from django.http import HttpResponse
from django.views.decorators.csrf import csrf_exempt
from django.views.generic import View
from django.views.generic.detail import SingleObjectMixin

from .models import Member

# Create your views here.
class TestView(SingleObjectMixin, View):
    model = Member

    def get(self, request, \*args, \*\*kwargs):
        return HttpResponse('hello, get\n')

    def post(self, request, \*args, \*\*kwargs):
        self.object = self.get_object()
        return HttpResponse('hello, {}\n'.format(self.object.name))

    def put(self, request, \*args, \*\*kwargs):
        return HttpResponse('hello, put\n')

    def delete(self, request, \*args, \*\*kwargs):
        return HttpResponse('hello, delete\n')

    @csrf_exempt
    def dispatch(self, request, \*args, \*\*kwargs):
        return super(TestView, self).dispatch(request, \*args, \*\*kwargs)
修改 URLConf 配置,传递一个动态参数,用于查找表中记录:
urlpatterns = [
    path('test-cbv/<int:pk>/', views.TestView.as_view(), name="test-cbv")
]
启动服务器,然后进行测试:
[root@server first_django_app]# curl -XPOST http://127.0.0.1:8888/hello/test-cbv/2/
hello, 会员2
[root@server first_django_app]# curl -XPOST http://127.0.0.1:8888/hello/test-cbv/4/
hello, spyinx-0
[root@server first_django_app]# curl -XPOST http://127.0.0.1:8888/hello/test-cbv/9/
hello, spyinx-5
[root@server first_django_app]# curl -XGET http://127.0.0.1:8888/hello/test-cbv/9/
hello, get
[root@server first_django_app]# curl -XPUT http://127.0.0.1:8888/hello/test-cbv/9/
hello, put
[root@server first_django_app]# curl -XDELETE http://127.0.0.1:8888/hello/test-cbv/9/
hello, delete
可以看到在 POST 请求中,我们通过传递主键值,就能返回 Member 表中对应记录中的 name 字段值,这一功能正是由SingleObjectMixin 中的 get_object() 方法提供的。通过继承这个查询功能,我们就不用再使用 ORM 模型进行查找了,这简化了我们的代码。当然,这只能满足一小部分的场景,对于更多复杂的场景,我们还是需要实现自己的逻辑,我们也可以把复杂的功能拆成各种 mixin,然后相关组合继承,这样可以很好的复用代码,这是一种良好的编码方式。
2. 深入理解 Django 类视图
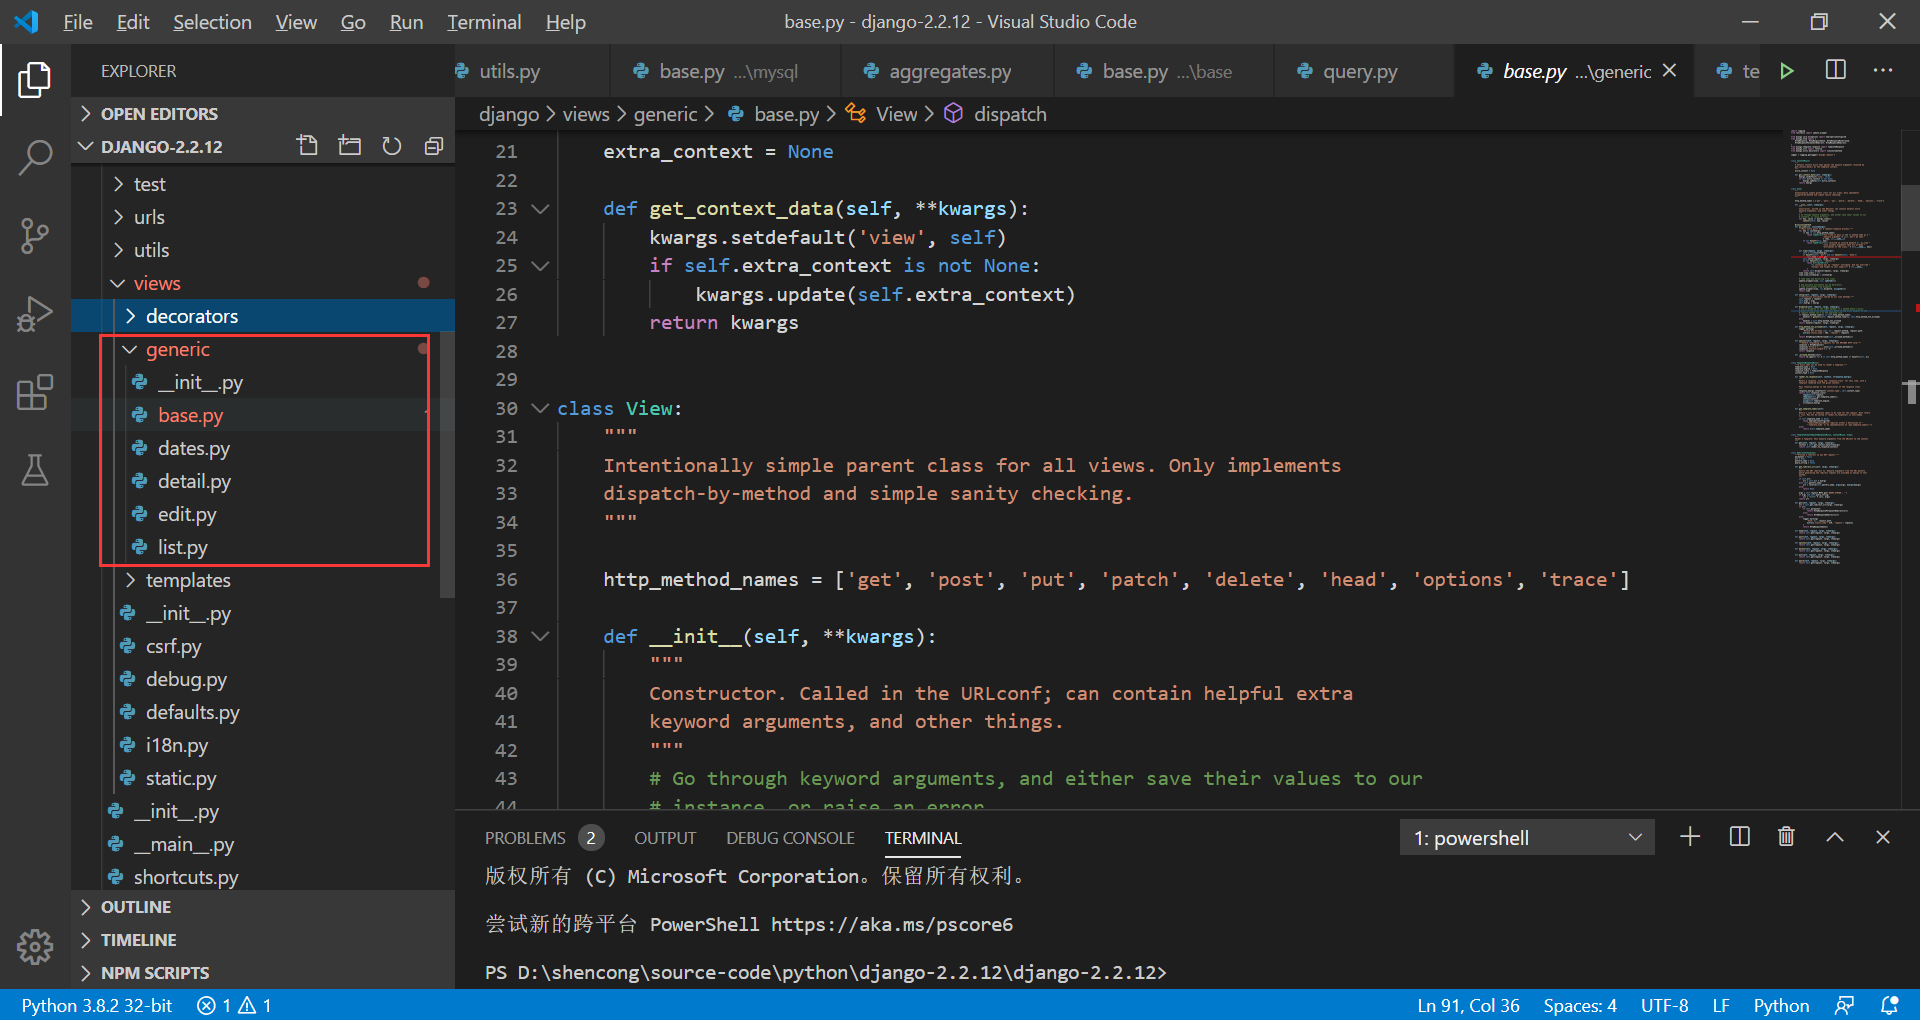
这里在介绍完类视图的基本使用后,我们来深入学习下 Django 的源代码,看看 Django 是如何将对应的 HTTP 请求映射到对应的函数上。这里我们使用的是 Django 2.2.10 的源代码进行说明。我们使用 VSCode 打开 Django 源码,定位到 django/views/generic 目录下,这里是和视图相关的源代码。

首先看 __init__.py 文件,内容非常少,主要是将该目录下的常用视图类导入到这里,简化开发者导入这些常用的类。其中最重要的当属 base.py 文件中定义的 view 类,它是其他所有视图类的基类。
# base.py中常用的三个view类
from django.views.generic.base import RedirectView, TemplateView, View

# dates.py中定义了许多和时间相关的视图类
from django.views.generic.dates import (
    ArchiveIndexView, DateDetailView, DayArchiveView, MonthArchiveView,
    TodayArchiveView, WeekArchiveView, YearArchiveView,
)
# 导入DetailView类
from django.views.generic.detail import DetailView
# 导入增删改相关的视图类
from django.views.generic.edit import (
    CreateView, DeleteView, FormView, UpdateView,
)
# 导入list.py中定义的显示列表的视图类
from django.views.generic.list import ListView

__all__ = [
    'View', 'TemplateView', 'RedirectView', 'ArchiveIndexView',
    'YearArchiveView', 'MonthArchiveView', 'WeekArchiveView', 'DayArchiveView',
    'TodayArchiveView', 'DateDetailView', 'DetailView', 'FormView',
    'CreateView', 'UpdateView', 'DeleteView', 'ListView', 'GenericViewError',
]

# 定义一个通用的视图异常类
class GenericViewError(Exception):
    """A problem in a generic view."""
    pass
接下来,我们查看 base.py 文件,重点分析模块中定义的 View 类:
# 源码路径 django/views/generic/base.py

# 忽略导入
# ...

class View:

    http_method_names = ['get', 'post', 'put', 'patch', 'delete', 'head', 'options', 'trace']

    def \_\_init\_\_(self, \*\*kwargs):
        # 忽略
        # ...

    @classonlymethod
    def as\_view(cls, \*\*initkwargs):
        """Main entry point for a request-response process."""
        for key in initkwargs:
            if key in cls.http_method_names:
                raise TypeError("You tried to pass in the %s method name as a "
                                "keyword argument to %s(). Don't do that."
                                % (key, cls.__name__))
            if not hasattr(cls, key):
                raise TypeError("%s() received an invalid keyword %r. as\_view "
                                "only accepts arguments that are already "
                                "attributes of the class." % (cls.__name__, key))

        def view(request, \*args, \*\*kwargs):
            self = cls(\*\*initkwargs)
            if hasattr(self, 'get') and not hasattr(self, 'head'):
                self.head = self.get
            self.setup(request, \*args, \*\*kwargs)
            if not hasattr(self, 'request'):
                raise AttributeError(
                    "%s instance has no 'request' attribute. Did you override "
                    "setup() and forget to call super()?" % cls.__name__
                )
            return self.dispatch(request, \*args, \*\*kwargs)
        view.view_class = cls
        view.view_initkwargs = initkwargs

        # take name and docstring from class
        update_wrapper(view, cls, updated=())

        # and possible attributes set by decorators
        # like csrf\_exempt from dispatch
        update_wrapper(view, cls.dispatch, assigned=())
        return view

    # ...

    def dispatch(self, request, \*args, \*\*kwargs):
        # Try to dispatch to the right method; if a method doesn't exist,
        # defer to the error handler. Also defer to the error handler if the
        # request method isn't on the approved list.
        if request.method.lower() in self.http_method_names:
            handler = getattr(self, request.method.lower(), self.http_method_not_allowed)
        else:
            handler = self.http_method_not_allowed
        return handler(request, \*args, \*\*kwargs)

    def http\_method\_not\_allowed(self, request, \*args, \*\*kwargs):
        logger.warning(
            'Method Not Allowed (%s): %s', request.method, request.path,
            extra={'status\_code': 405, 'request': request}
        )
        return HttpResponseNotAllowed(self._allowed_methods())

    # 忽略其他函数
    # ...

# ...
我们来仔细分析 view 类中的这部分代码。view 类首先定义了一个属性 http_method_names,表示其支持的 HTTP 请求方法。接下来最重要的是 as_view() 方法和 dispatch() 方法。在上面使用视图类的示例中,我们定义的 URLConf 如下:
# first\_django\_app/hello\_app/urls.py

from . import views

urlpatterns = [
    # 类视图
    url(r'test-cbv/', views.TestView.as_view(), name='test-cbv'),
]
这里结合源码可以看到,views.TestView.as_view() 返回的结果同样是一个函数:view(),它的定义和前面的视图函数一样。as_view() 函数可以接收一些参数,函数调用会先对接收的参数进行检查:
for key in initkwargs:
    if key in cls.http_method_names:
        raise TypeError("You tried to pass in the %s method name as a "
                        "keyword argument to %s(). Don't do that."
                        % (key, cls.__name__))
    if not hasattr(cls, key):
        raise TypeError("%s() received an invalid keyword %r. as\_view "
                         "only accepts arguments that are already "
                         "attributes of the class." % (cls.__name__, key))
上面的代码会对 as_view() 函数传递的参数做两方面检查:
首先确保传入的参数不能有 get、post 这样的 key 值,否则会覆盖 view 类中的对应方法,这样对应的请求就无法正确找到函数进行处理。覆盖的代码逻辑如下:
class View:
    # ...
    def \_\_init\_\_(self, \*\*kwargs):
        # 这里会将所有的传入的参数通过setattr()方法给属性类赋值
        for key, value in kwargs.items():
            setattr(self, key, value)
    # ...
    @classonlymethod
    def as\_view(cls, \*\*initkwargs):
        # ...

        def view(request, \*args, \*\*kwargs):
            # 调用视图函数时,会将这些参数传给View类来实例化
            self = cls(\*\*initkwargs)
            # ...

        # ...
    # ...
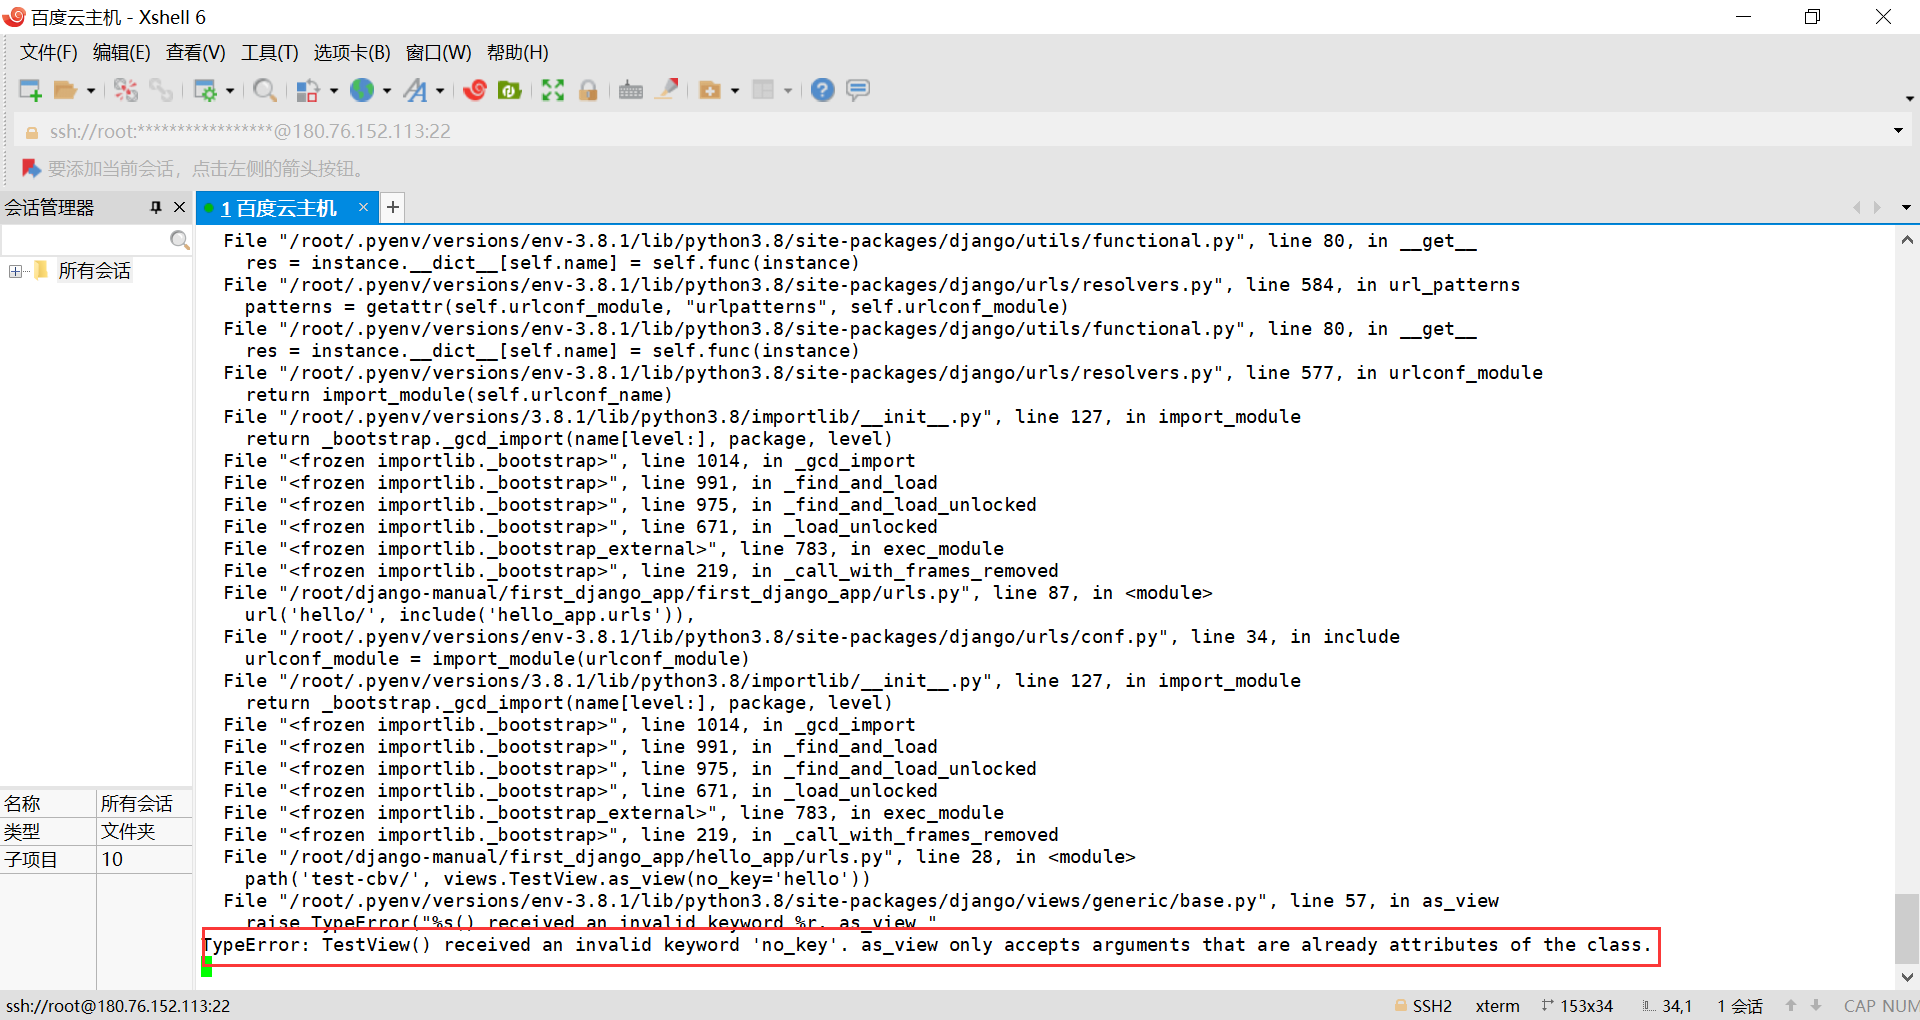
此外,不可以传递类中不存在的属性值。假设我们将上面的 URLConf 进行略微修改,如下:
from . import views

urlpatterns = [
    # 类视图
    url(r'test-cbv/', views.TestView.as_view(no_key='hello'), name='test-cbv'),
]
启动后,可以发现 Django 报错如下,这正是由本处代码抛出的异常。

接下来看下 update_wrapper() 方法,这个只是 python 内置模块中的一个方法,只是比较少用,所以会让很多人感到陌生。先看它的作用:
update_wrapper() 这个函数的主要功能是负责复制原函数的一些属性,如 moudle、name、doc 等。如果不加 update_wrapper(), 那么被装饰器修饰的函数就会丢失其上面的一些属性信息。
具体看一个测试代码示例:
from functools import update_wrapper

def test\_wrapper(f):
    def wrapper\_function(\*args, \*\*kwargs):
        """装饰函数,不保留原信息"""
        return f(\*args, \*\*kwargs)
    return wrapper_function

def test\_update\_wrapper(f):
    def wrapper\_function(\*args, \*\*kwargs):
        """装饰函数,使用update\_wrapper()方法保留原信息"""
        return f(\*args, \*\*kwargs)
    update_wrapper(wrapper_function, f)
    return wrapper_function

@test_wrapper
def test\_wrapped():
    """被装饰的函数"""
    pass

@test_update_wrapper
def test\_update\_wrapped():
    """被装饰的函数,使用了update\_wrapper()方法"""
    pass

print('不使用update\_wrapper()方法:')
print(test_wrapped.__doc__)
print(test_wrapped.__name__)
print()
print('使用update\_wrapper()方法:')
print(test_update_wrapped.__doc__)
print(test_update_wrapped.__name__)
执行结果如下:
不使用update_wrapper()方法:
装饰函数,不保留原信息
wrapper_function

使用update_wrapper()方法:
被装饰的函数,使用了update_wrapper()方法
test_update_wrapped
可以看到,不使用 update_wrapper() 方法的话,函数在使用装饰器后,它的一些基本属性比如 __name__ 等都是正真执行函数(比如上面的 wrapper_function() 函数)的属性。不过这个函数在分析视图函数的处理流程上并不重要。接下来看 as_view 中定义的 view() 方法,它是真正执行 HTTP 请求的视图函数:
def view(request, \*args, \*\*kwargs):
    self = cls(\*\*initkwargs)
    # 如果有get方法而没有head方法,对于head请求则直接使用get()方法进行处理
    if hasattr(self, 'get') and not hasattr(self, 'head'):
        self.head = self.get
    # 将Django对应传过来的请求实例以及相应参数赋给实例属性
    self.setup(request, \*args, \*\*kwargs)
    # 如果没有request属性,表明可能重写了setup()方法,而且setup()里面忘记了调用super()
    if not hasattr(self, 'request'):
        raise AttributeError(
            "%s instance has no 'request' attribute. Did you override "
            "setup() and forget to call super()?" % cls.__name__
        )
    # 调用dispatch()方法
    return self.dispatch(request, \*args, \*\*kwargs)
view() 方法里面会调用 setup() 方法将 Django 给视图函数传递的参数赋给实例变量,然后会调用 dispatch()方法去处理请求。两个函数的代码如下:
def setup(self, request, \*args, \*\*kwargs):
    """Initialize attributes shared by all view methods."""
    self.request = request
    self.args = args
    self.kwargs = kwargs

def dispatch(self, request, \*args, \*\*kwargs):
    # Try to dispatch to the right method; if a method doesn't exist,
    # defer to the error handler. Also defer to the error handler if the
    # request method isn't on the approved list.
    if request.method.lower() in self.http_method_names:
        handler = getattr(self, request.method.lower(), self.http_method_not_allowed)
    else:
        handler = self.http_method_not_allowed
    return handler(request, \*args, \*\*kwargs)
这里最核心的就是这个 dispatch() 方法了。首先该方法通过 request.method.lower() 这个可以拿到 http 的请求方式,比如 get、post、put 等,然后判断是不是在预先定义好的请求方式的列表中。如果满足,那么最核心的代码来了:
handler = getattr(self, request.method.lower(), self.http_method_not_allowed)
假设客户端发的是 get 请求,那么 request.method.lower() 就是 “get” ,接下来执行上面的代码,就会得到我们定义的视图类中定义的 get 函数,最后返回的是这个函数的处理结果。这就是为啥 get 请求能对应到视图函数中get() 方法的原因。其他的请求也是类似的,如果是不支持的请求,则会执行 http_method_not_allowed() 方法。
return handler(request, \*args, \*\*kwargs)
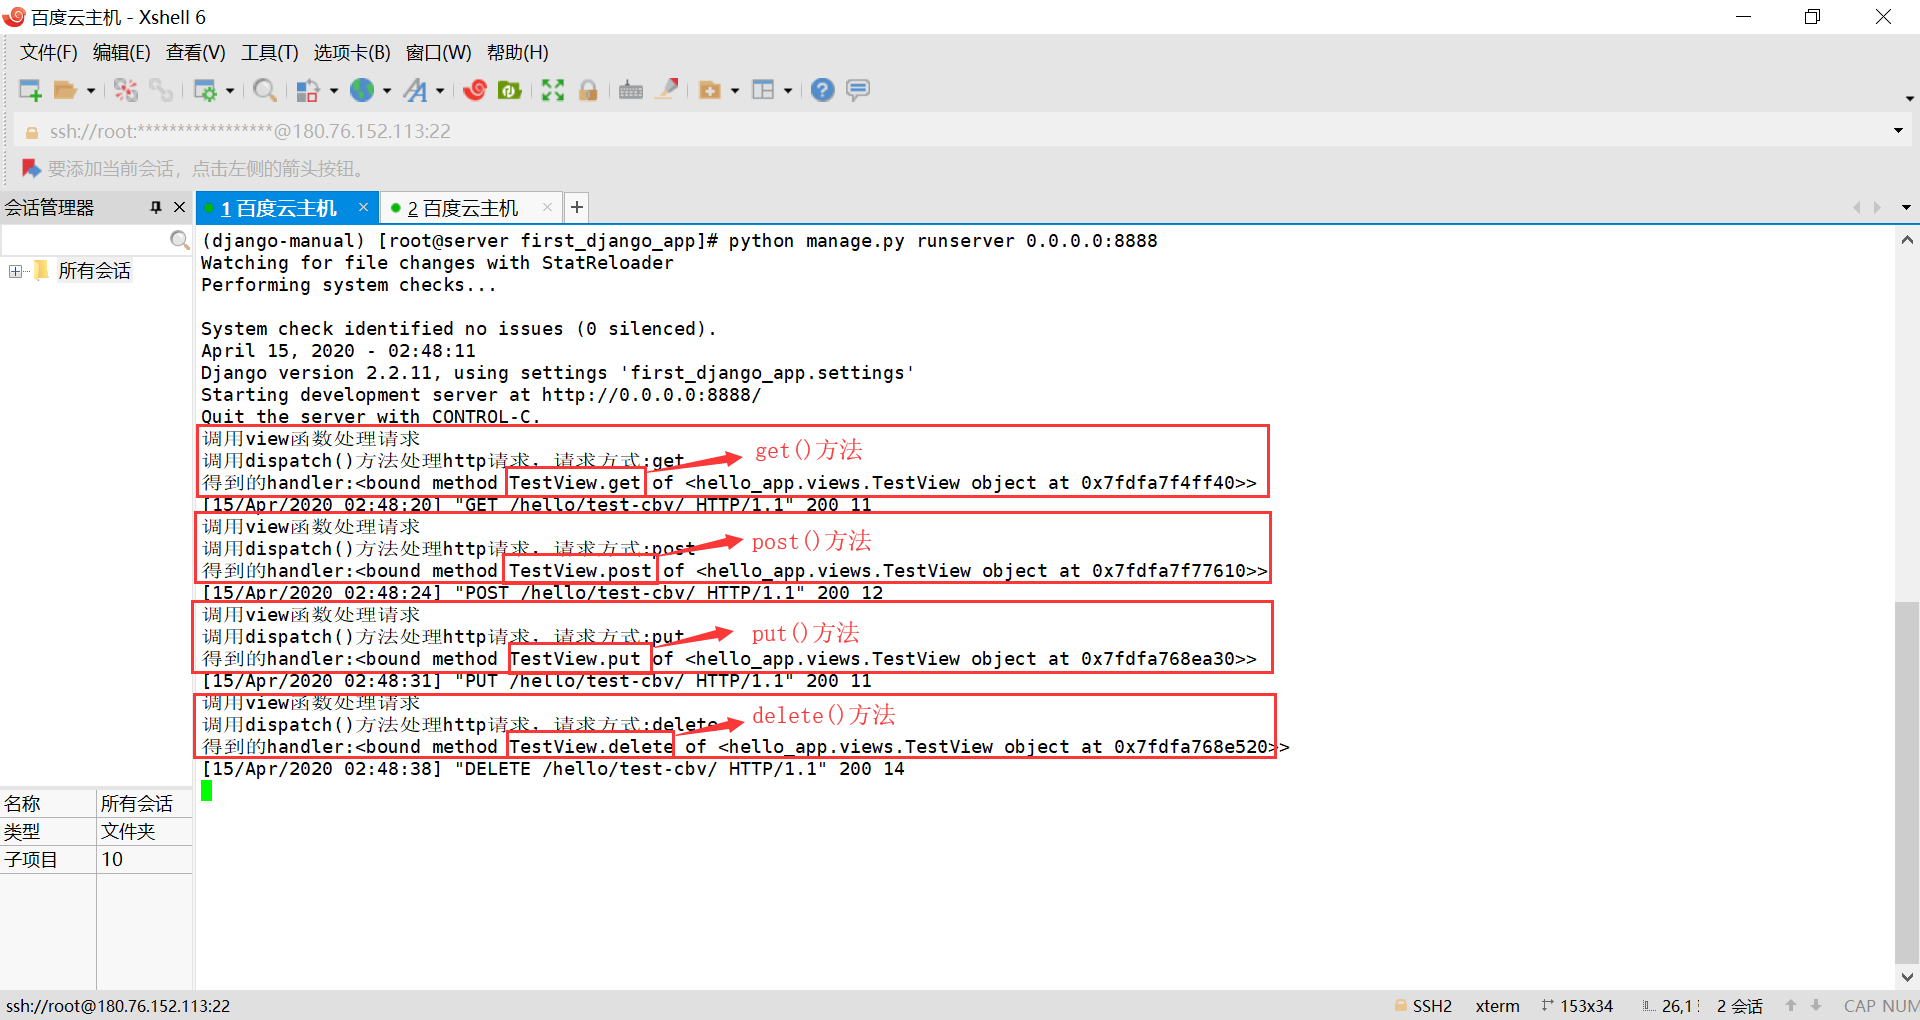
如果对这部分代码的执行流程还有疑问的,我们可以在 Django 的源码中添加几个 print() 函数,然后通过实际请求来看看执行过程:
[root@server first_django_app]# cat ~/.pyenv/versions/django-manual/lib/python3.8/site-packages/django/views/generic/base.py
    class View:
    ...

    @classonlymethod
    def as_view(cls, **initkwargs):
        ...

        def view(request, *args, **kwargs):
            print('调用view函数处理请求')
            ...

    ...

    def dispatch(self, request, *args, **kwargs):
        # Try to dispatch to the right method; if a method doesn't exist,
        # defer to the error handler. Also defer to the error handler if the
        # request method isn't on the approved list.
        print('调用dispatch()方法处理http请求,请求方式:{}'.format(request.method.lower()))
        if request.method.lower() in self.http_method_names:
            handler = getattr(self, request.method.lower(), self.http_method_not_allowed)
            print('得到的handler:{}'.format(handler))
        else:
            handler = self.http_method_not_allowed
        return handler(request, *args, **kwargs)
接下来我们还是使用前面定义的视图类 TestView 来进行操作,操作过程以及实验结果如下:
# 一个窗口启动 django 工程
(django-manual) [root@server first_django_app]# python manage.py runserver 0.0.0.0:8888
Watching for file changes with StatReloader
Performing system checks...

System check identified no issues (0 silenced).
April 15, 2020 - 04:30:04
Django version 2.2.11, using settings 'first\_django\_app.settings'
Starting development server at http://0.0.0.0:8888/
Quit the server with CONTROL-C.

# 另一个窗口发送http请求
[root@server django-manual]# curl -XGET http://127.0.0.1:8888/hello/test-cbv/
hello, get
[root@server django-manual]# curl -XPOST http://127.0.0.1:8888/hello/test-cbv/
hello, post
[root@server django-manual]# curl -XPUT http://127.0.0.1:8888/hello/test-cbv/
hello, put
[root@server django-manual]# curl -XDELETE http://127.0.0.1:8888/hello/test-cbv/
hello, delete

3. 小结
本小节中,我们简单介绍了视图类的使用以及一些高级用法。接下来我们分析了 Django 源码中的 View 类以及 Django 是如何将请求映射到对应的函数上执行,这部分代码是比较简单易懂的。只有慢慢深入了解 Django 的源代码,了解整个 Django 框架背后为我们做的事情,才能从入门到真正掌握 Django。