使用图像数据来训练模型
在之前的学习中,我们曾经学习过使用 Keras 进行图片分类。具体来说,我们学习了:
- 将二位图片数据进行扁平化处理;
- 将图片数据使用卷积神经网络进行处理。
然而在实际的机器学习之中,当我们使用图片数据来训练模型的时候,我们会用到更多的操作。因此在这节课之中我们便整体地了解一下如何使用图像数据来构建数据集。
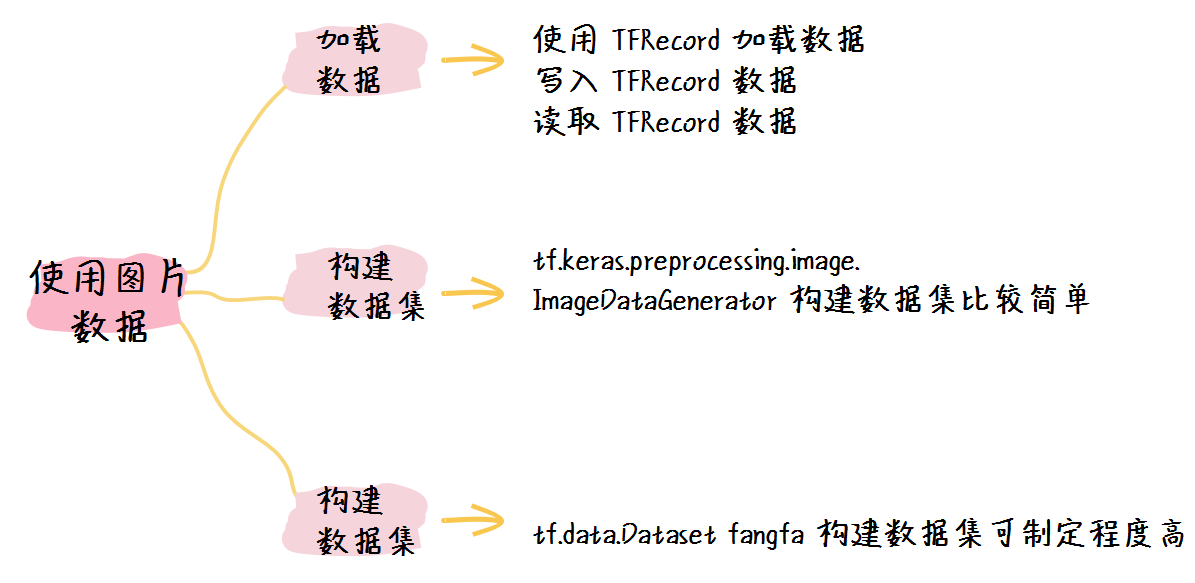
在实际的应用过程中,我们最常用的图片数据加载方式一共有三种,因此这节课我们主要学习这三种主要地图片加载方式:
- 使用 TFRecord 构建图片数据集;
- 使用 tf.keras.preprocessing.image.ImageDataGenerator 构建图片数据集;
- 使用 tf.data.Dataset 原生方法构建数据集。
在这节课之中,我们使用之前用过的猫狗分类的数据集之中的猫的训练集的图片进行测试,具体来说,我们可以通过以下代码准备具体的数据集:
import tensorflow as tf
import os

dataset_url = 'https://storage.googleapis.com/mledu-datasets/cats\_and\_dogs\_filtered.zip'
path_download = os.path.dirname(tf.keras.utils.get_file('cats\_and\_dogs.zip', origin=dataset_url, extract=True))

cat_train_dir = path_download + '/cats\_and\_dogs\_filtered/train/cats'
这样,cat_train_dir 就是我们要测试的图片的路径。
1. 使用TFRecord构建图片数据集
TFRecord 是一种二进制的数据文件,也正是因为 TFRecord 是一种二进制的数据文件,因此他的读写速度较快,同时也不会产生编码错误之类的问题。
使用 TFRecord 主要包括两个步骤:
- 生成 TFRecord 文件并进行存储;
- 读取 TFRecord 文件,并用于训练。
1. 生成 TFRecord 文件并进行存储
既然我们已经获得了图片文件所在的目录,那么我们便可以生成 TFRecord 文件:
from PIL import Image

# 打开TFRecord文件
writer = tf.io.TFRecordWriter('./cat\_data')

for img_path in os.listdir(cat_train_dir):
  # 读取并将图片Resize
  img = os.path.join(cat_train_dir, img_path)
  img = Image.open(img)
  img = img.convert('RGB').resize((32,32)).tobytes()

  # 定义标签,假设猫的标签是0
  label = 0  # 0:cat, 1:dog

  # 构建一条数据
  example = tf.train.Example(
    features = tf.train.Features(
      feature = {
        'label': tf.train.Feature(int64_list=tf.train.Int64List (value=[int(label)])),
        'data' : tf.train.Feature(bytes_list=tf.train.BytesList(value=[img]))
      }
    )
  )

  # 将数据写入
  writer.write(example.SerializeToString())
writer.close()
如上述代码所示,我们首先需要打开 TFRecord 文件,然后再保存结束时再将其关闭。
其次我们首先使用读取了图片文件,然后将其进行了以下处理:
- 转化为 RGB 模式;
- Resize 到 (32,32 )大小;
- 转化为二进制字节数据。
最后我们使用 tf.train.Example 函数将每一条数据按照 label 和 data 的形式进行封装,并写入到 TFRecord 文件之中。
2. 读取 TFRecord 文件
在读取的时候,我们会将 TFRecord 文件读入到内存之中,并且转化为 tf.data.Dataset ,以便日后使用。
cat_reader = tf.data.TFRecordDataset('./cat\_data')

def decode\_image(example):
    # 加载单条数据
    single_example = tf.io.parse_single_example(
                example,
                {
                  'data' : tf.io.FixedLenFeature([], tf.string),
                  'label': tf.io.FixedLenFeature([], tf.int64)
                }
              )
    img = single_example['data']
    label = single_example['label']

    # 图片处理
    img = tf.io.decode_raw(img, tf.uint8)
    img = tf.reshape(img, [32, 32, 3])
    return (img, label)

# 映射并分批次
cat_dataset = cat_reader.map(decode_image).batch(32)

print(cat_dataset)
这其中有几点需要注意:
- 首先我们需要根据存储的路径来载入 TFRecord ;
- 我们需要使用一个函数来处理每一条数据,这个函数可以通过 cat_reader.map() 来调用;
- 在 decode_image 之中:
- tf.io.parse_single_example 函数用于加载每一条数据,它接收两个参数,第一个是当前数据,第二个是数据的格式;
- 我们又采用了 tf.io.decode_raw 函数来对图片进行了解码,将其转化为数字类型。
- 最后我们将图片数据分批次,大小为32 。
于是我们可以得到输出为:
<BatchDataset shapes: ((None, 32, 32, 3), (None,)), types: (tf.uint8, tf.int64)>
由此可见,我们正确地加载了该数据集。
2.使用 tf.keras.preprocessing.image.ImageDataGenerator 构建图片数据集
使用这种方式会非常简单,我们只需要一条语句即可实现:
cat_generator = tf.keras.preprocessing.image.ImageDataGenerator().flow_from_directory(
                    directory=path_download + '/cats\_and\_dogs\_filtered/train',
                    target_size=(32, 32),
                    batch_size=32,
                    shuffle = True,
                    class_mode='binary')

print(cat_generator)
我们可以得到如下输出:
Found 2000 images belonging to 2 classes.
<tensorflow.python.keras.preprocessing.image.DirectoryIterator object at 0x7f28d0c4a048>
在使用的过程中, directory 参数需要我们注意,该路径应该是图片路径之外的一层路径。
也就是说,如果图片路径为“/a/b/c.jpg”,那么我们要传入的路径应该是“/a”。
其余的参数为:
- target_size: 图片的大小;
- batch_size: 批次大小;
- shuffle: 是否乱序;
- class_modle: 若是binary则为二分类,multi则为多分类。
由于我们得到的数据集是一个迭代器,因此我们不能使用常用的 fit 方式来训练,我们可以通过以下方式进行训练:
model.fit_generator(cat_generator)
3. 使用 tf.data.Dataset 原生方法构建数据集
使用这种方法也非常简单,我们需要两个步骤来进行数据集的构建:
- 定义图片加载函数;
- 使用 tf.data.Dataset 构建数据集。
于是我们可以使用如下代码进行数据集的构建:
def load\_image(img_path):
    label = tf.constant(0,tf.int8)
    img = tf.io.read_file(img_path)
    img = tf.image.decode_jpeg(img)
    img = tf.image.resize(img, (32, 32))
    return (img,label)

cat_dataset = tf.data.Dataset.list_files(cat_train_dir).map(load_image).batch(32)

print(cat_dataset)
在这段程序中,我们首先在载入图片函数中进行了如下处理:
- 定义标签,因为全部是猫,因此我们设置为 0 ;
- 使用 tf.io.read_file 读取文件;
- 因为我们的图片都是 jpeg 格式,因此我们使用 tf.image.decode_jpeg 来解码图片;
- 最后使用 tf.image.resize 来对图片进行尺寸调整,统一为(32, 32)。
然后我们使用 tf.data.Dataset.list_files() 函数构建了数据集,它接收的第一个参数就是图片所在的文件夹。
我们可以得到输出:
<BatchDataset shapes: ((None, 32, 32, None), (None,)), types: (tf.float32, tf.int8)>
可见我们已经成功地构建了数据集。
4. 小结
在这节课之中,我们学习了三种图片数据加载的方式,他们分别是:
- 使用 TFRecord 构建图片数据集;
- 使用 tf.keras.preprocessing.image.ImageDataGenerator 构建图片数据集;
- 使用 tf.data.Dataset 原生方法构建数据集。
其中第一种方式最为快速,而第二种方式更为方便,我们可以根据自己的实际需求来进行选择。
